


Getting seated dumbbell shoulder press form right comes down to three things: how you set the bench, how you brace before the first rep, and how you control the dumbbells through the full range of motion. Most people rush past all three and end up pressing with their lower back instead of their shoulders. This guide walks through the setup, the execution, and the mistakes that quietly wreck shoulder health over time.
Why the Seated Position Changes the Exercise
Sitting down removes the leg drive and torso sway that standing presses allow. That is the point. A seated dumbbell shoulder press isolates the deltoids more directly, which means your shoulders do the work your legs and hips would otherwise help with. This makes the seated version harder pound for pound than the standing version, even though the weight on the dumbbells might look identical.
It also means bad form shows up faster. Without the ability to lean back and use momentum, any weakness in your upper back or core gets exposed almost immediately. That is a feature, not a flaw, but it is worth knowing before you load the dumbbells heavier than your standing press numbers.
Setting Up Correctly Before You Lift
1. Bench Angle and Back Support
Use a bench set to a 75 to 90 degree incline. A completely vertical 90 degree back pad gives the strictest form and the least assistance from your legs. A slight recline toward 80 or 75 degrees lets you brace your upper back against the pad, which is useful if you are pressing heavier weight and want a bit more stability without turning the movement into an incline press.
Avoid anything below 75 degrees. Once the bench reclines too far, the exercise starts to resemble an incline chest press with a vertical press path lost, and the shoulders no longer get direct overhead loading.
2. Foot Position and Core Bracing
Plant both feet flat on the floor, roughly hip-width apart. This gives you a stable base and keeps your pelvis from tilting during the harder reps. Before you pick up the dumbbells, brace your core the way you would before a deadlift, pulling your ribs down and tightening your midsection. This single habit prevents most of the lower back arching that causes discomfort during heavier sets.
Step-by-Step Execution
1. Starting Position
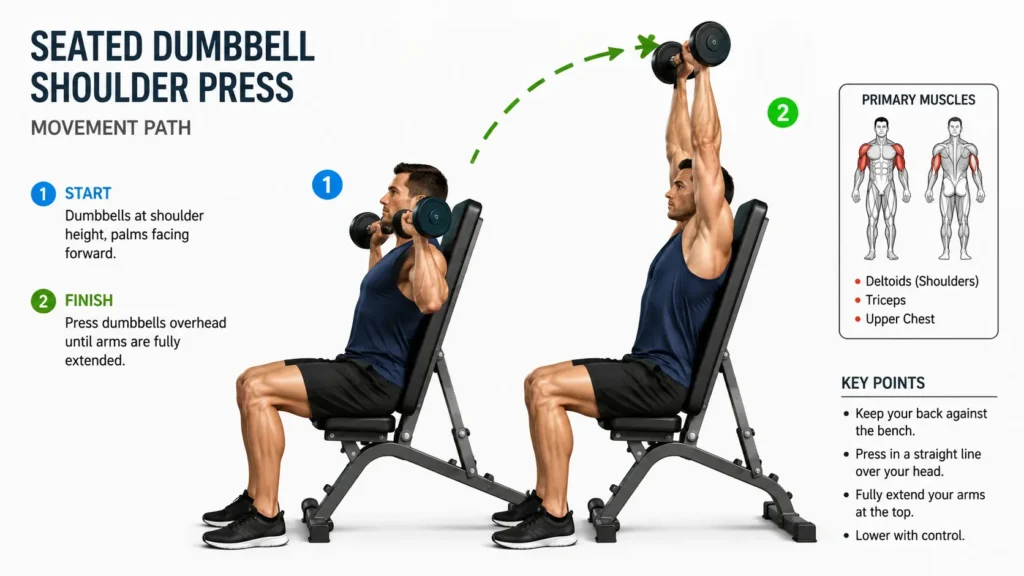
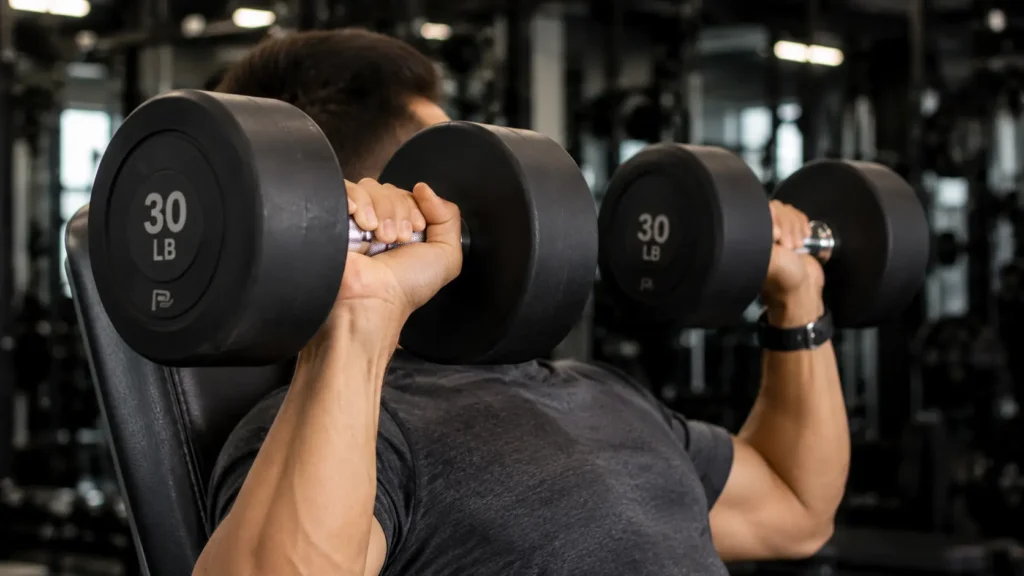
Rest the dumbbells on your thighs, then use your knees to help kick them up to shoulder height as you sit back. Your palms should face forward, with the dumbbells sitting just outside your shoulders and your elbows bent to roughly 90 degrees. Your wrists should stay stacked directly over your elbows, not tilted back, since a bent wrist under load is a common source of forearm strain.
2. The Press
Press both dumbbells straight up in a smooth, controlled path. Let the dumbbells drift slightly inward as they approach the top, ending close together above your head rather than out wide. Avoid locking your elbows out aggressively at the top. A soft lockout keeps tension on the deltoids and protects the elbow joint from repeated jarring.
3. The Descent
Lower the dumbbells back down with the same control you used to press them up. Most people lower far too fast, which turns the eccentric portion of the lift into a wasted rep. Aim for a two to three second descent, stopping when your upper arms are roughly parallel to the floor or your elbows reach shoulder height. Going lower than that shifts more stress onto the front of the shoulder joint without adding meaningful muscle activation.
Common Form Mistakes and How to Fix Them
Excessive lower back arch is the most frequent issue, and it usually means the weight is too heavy for a strict seated press. If you notice your lower back lifting off the pad or your ribs flaring upward as you press, reduce the load and rebuild your core brace before adding weight back.
Flaring the elbows too far forward is another common error. When the dumbbells start in front of your shoulders instead of beside them, the front deltoids take on disproportionate load and the shoulder joint loses stability. Keep the dumbbells stacked directly above or just outside the shoulders throughout the movement.
Uneven pressing, where one arm finishes before the other, points to a strength imbalance between sides. Rather than compensating by shifting your torso, slow down and let the weaker side set the pace. If the imbalance is significant, drop the weight slightly and work both arms together until they match.
Shrugging the shoulders up toward the ears during the press takes tension away from the deltoids and hands it to the upper traps. Keep your shoulders pulled down and back throughout the set, especially as you approach the top of each rep.
Muscles Worked and Why Form Matters
The seated dumbbell shoulder press primarily targets the anterior and lateral heads of the deltoid, with the triceps assisting through elbow extension and the upper traps stabilizing the shoulder blades. Because the seated position limits body English, correct form directly determines which of these muscles actually gets trained. Sloppy form with flared elbows and a rushed descent shifts work toward the front deltoid and away from the lateral head, which is usually the muscle people are trying to build when they choose this exercise over other pressing variations.
Good form also protects the rotator cuff. The shoulder joint has a small range where it is mechanically stable under overhead load, and pressing outside that range repeatedly, especially with heavy dumbbells, is a common contributor to shoulder impingement over months of training.
Seated vs Standing Dumbbell Press
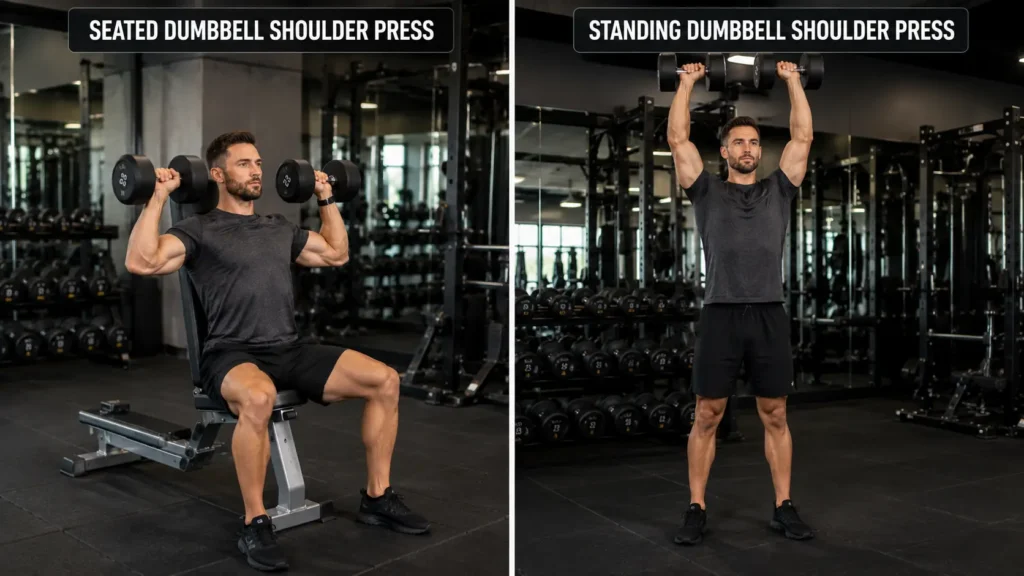
The standing version allows a small amount of leg drive and torso lean, which typically lets you handle slightly more weight. It also demands more core and full-body stability, making it a reasonable choice if your goal includes general strength and coordination alongside shoulder development.
The seated version isolates the shoulders more strictly and removes lower back strain risk that comes from standing presses with poor bracing. For anyone new to overhead pressing, or anyone with a history of lower back discomfort, the seated dumbbell shoulder press is the safer starting point. Experienced lifters often use both, standing for heavier strength work and seated for higher rep hypertrophy sets where strict form matters more than total load.
How Many Sets and Reps to Use
For general shoulder strength and size, three to four sets of eight to twelve reps works well for most lifters, using a weight where the last two reps of each set are genuinely difficult without breaking form. If your priority is raw pressing strength, drop the rep range to four to six reps for three to five sets, with longer rest periods between sets.
Beginners should spend the first few weeks with lighter dumbbells, focusing entirely on the movement path and bracing pattern before adding meaningful load. Rushing the weight increase on this exercise is one of the fastest ways to develop shoulder pain that lingers for months.
Who Should Modify or Avoid This Exercise
Anyone with a current shoulder injury, a history of impingement, or significant pain during overhead movement should check with a physical therapist or doctor before performing this exercise. A neutral grip variation, where palms face each other instead of forward, often reduces shoulder joint stress and is worth trying if the standard grip causes discomfort.
People with lower back issues generally tolerate the seated version better than the standing version, but should still avoid any bench angle that encourages excessive arching, and should keep the core braced throughout every set.
Quick Form Checklist
Before your next set, run through this sequence: bench set between 75 and 90 degrees, feet flat and core braced, dumbbells starting at shoulder height with wrists stacked over elbows, a controlled press ending in a soft lockout, and a slow, deliberate descent back to the start. Consistently hitting each of these points is what separates a shoulder press that builds strength from one that quietly builds injury risk.

