

The Russian twist exercise looks simple on video, but most people get the form wrong before they even pick up a weight. The rotation gets rushed, the lower back rounds, and the arms end up doing work that should come from the obliques. Done correctly, this move builds real rotational strength and carves definition into your midsection. Done carelessly, it can aggravate a cranky lower back. This guide covers exact form, the mistakes worth fixing first, and safer alternatives if your back objects to the seated position. It also shows how to fit Russian twists into a workout that delivers results. Whether you are adding core work to a home routine or training rotational power for a sport, the same form principles apply.
What Is the Russian Twist Exercise
The Russian twist is a seated core exercise that trains your torso to rotate against resistance. You sit on the floor and lean back slightly. Lift your feet if you are ready for the added challenge, then twist your torso from side to side. Some version of this movement has been part of strength training for decades. It was popular with wrestlers, boxers, and rotational-sport athletes long before becoming a staple in home ab workouts.
Unlike a crunch, which only flexes your spine forward, the Russian twist adds rotation. That single difference is what makes it valuable, and it is also what makes sloppy form riskier than it looks.
The name is often traced to conditioning drills used by Soviet athletes and soldiers. The exact history, though, is hard to pin down. Today it shows up in programs for boxers, golfers, tennis players, and anyone chasing a stronger core.
Muscles Worked by the Russian Twist
The primary target is your obliques, the muscles along the sides of your torso that control rotation and side bending. Your rectus abdominis, the muscle responsible for the visible six-pack, works isometrically to keep your spine from collapsing as you twist.
Your transverse abdominis, a deep muscle that wraps around your midsection like a corset, braces your trunk throughout the set. Your hip flexors hold your legs in position when your feet are off the floor. Adding a weight brings your shoulders, lats, and spinal erectors into play too.
How to Do a Russian Twist With Proper Form
Step-by-Step Instructions
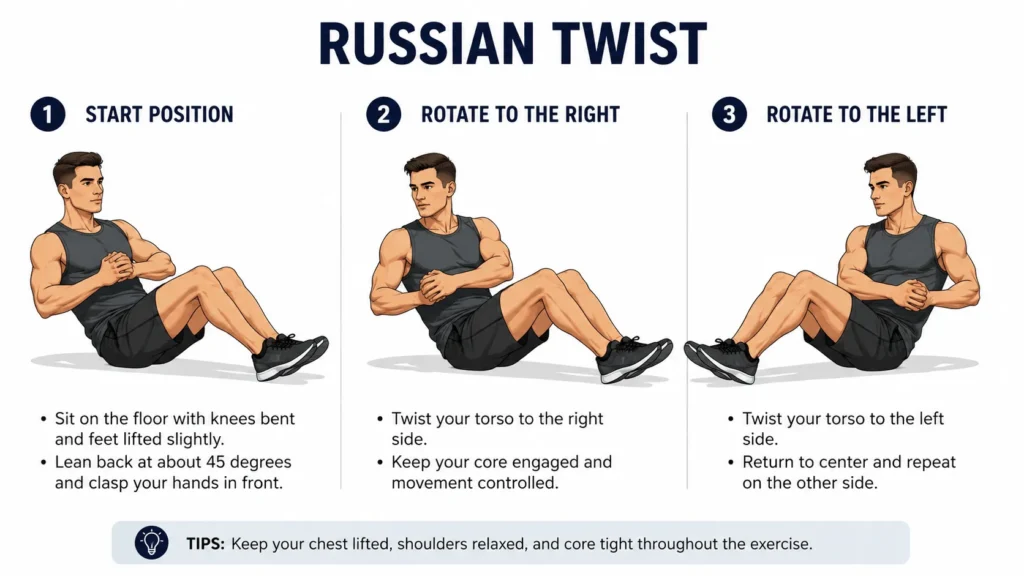
- Sit on the floor with your knees bent and feet flat on the ground.
- Lean back until your torso sits at roughly a 45-degree angle, keeping your spine straight rather than rounded.
- Lift your feet a few inches off the floor if you can balance comfortably. Beginners can keep their heels down.
- Clasp your hands together in front of your chest, or hold a weight with both hands.
- Brace your core as if you are about to take a light punch to the stomach.
- Rotate your torso to the right, bringing your hands or the weight toward the floor beside your hip.
- Reverse the motion and rotate to the left side.
- Continue alternating sides in a controlled rhythm. Exhale as you twist, inhale as you return to center.
Common Russian Twist Mistakes and How to Fix Them
Rounding the lower back is the most common fault. Leaning too far back without bracing your core lets your lumbar spine round forward. Fix it by leaning back only as far as you can hold a straight spine. Stop the descent the moment your back starts to curve.
Twisting from the arms instead of the torso is a close second. If your hands swing but your ribcage barely moves, your arms are doing work meant for your obliques. Fix it by watching your chest in a mirror; your shoulders and ribs should rotate together as one unit.
Moving too fast looks impressive on video, but it also lets momentum replace muscle tension. Fix it by slowing down enough to actually feel the obliques working on both the twist and the return.
Letting the hips rock side to side undermines the whole exercise. The hips should stay quiet while the torso rotates above them. Fix it by pressing your sit bones into the floor and keeping your knees still throughout the set.
Holding your breath is a habit worth breaking early. Bracing does not mean holding air in your lungs. Fix it by exhaling through each rotation, which also helps you control the movement instead of muscling through it.
Is the Russian Twist Bad for Your Lower Back?
For most healthy adults, a controlled Russian twist with a neutral spine is safe and effective. The concern is combining spinal flexion with rotation. This happens when you lean back too far and let your lower back round while twisting. That combination adds shear stress to the lumbar discs, a well-documented mechanism behind disc irritation in strength training.
This does not mean the exercise is dangerous for everyone. It means form matters more here than in most core exercises. If you have a history of disc problems or ongoing lower back pain, talk with a doctor or physical therapist first. The same goes if you are recovering from a back injury. Pregnant individuals are often advised to avoid seated rotational core work, particularly later in pregnancy. Checking with a healthcare provider first is the safer route.
If you feel any sharp or shooting pain, stop immediately. General muscle fatigue in the obliques is expected. Pain in the spine itself is not.
Russian Twist Variations by Skill Level
1: Feet-Down Russian Twist (Beginner)
Keep your heels on the floor throughout the set for a beginner-friendly starting point. This removes the balance challenge and shifts more of the demand onto pure rotation. It is a good entry point if you are new to the movement or rebuilding core strength after time off.
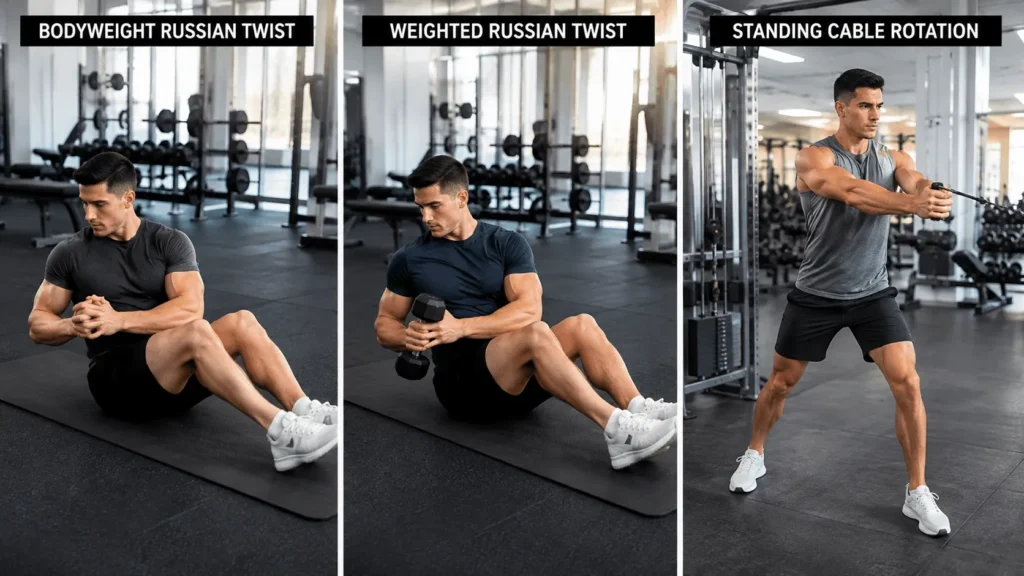
2: Weighted Russian Twist
Hold a dumbbell, weight plate, or medicine ball with both hands to add resistance. Start light, since the rotational leverage makes even a small weight feel heavier than it looks. Ten to twenty pounds is plenty for most intermediate lifters.
3: Feet-Elevated Russian Twist (Advanced)
Lifting your feet off the floor adds a balance and hip flexor demand on top of the rotation. This version increases core activation but also increases the temptation to round your back. Only progress here once your form stays clean with feet down.
4: Stability Ball Russian Twist
Lying with your upper back on a stability ball shifts the exercise into a different plane. It reduces load on the lower spine, since your hips stay extended rather than flexed. It is a useful option for people managing lower back sensitivity who still want rotational core work.
5: Standing Cable or Band Russian Twist
Standing versions using a cable machine or resistance band remove spinal loading entirely. They train the same rotational pattern used in throwing, swinging, and striking sports. This is often the better choice for athletes chasing rotational power over an ab burn.
How to Program Russian Twists Into Your Workout
Russian twists work best as an accessory movement near the end of a core or full-body session, not as a warm-up. Two to three sets of twelve to twenty total twists is a reasonable starting point. Count a twist to each side as one rep.
Two to three sessions per week is enough, since the obliques recover quickly but still need rest between sessions. Pair Russian twists with an anti-rotation exercise, such as a plank or a Pallof press. This builds a more complete core routine that trains your midsection to both create and resist rotation.
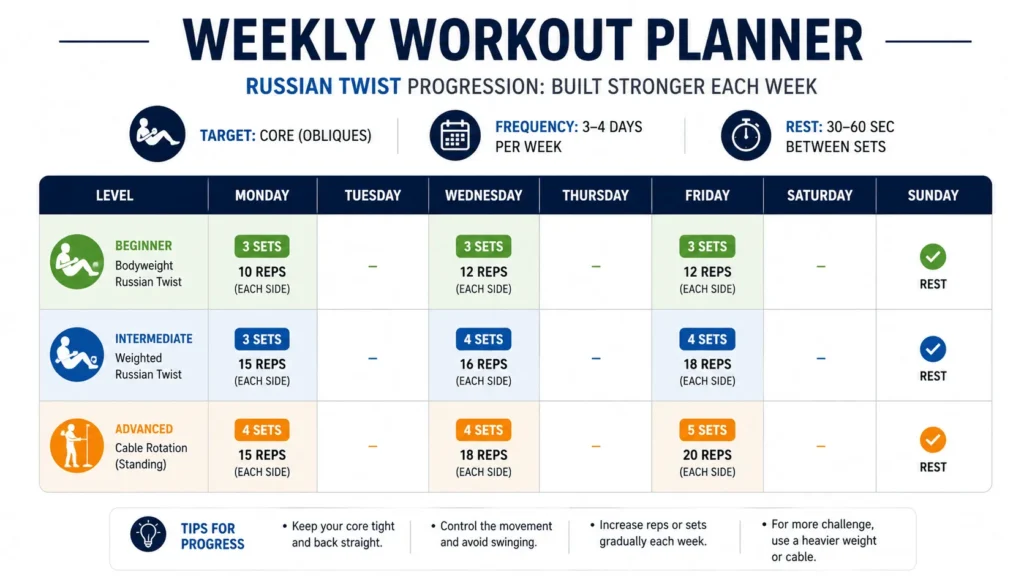
If you are starting out, spend two to three weeks on the feet-down bodyweight version before adding load or lifting your feet. Progress to light weight with feet down, then combine weight with lifted feet once both feel controlled. Rushing this progression is the most common reason people end up with a sore back instead of a stronger one.