
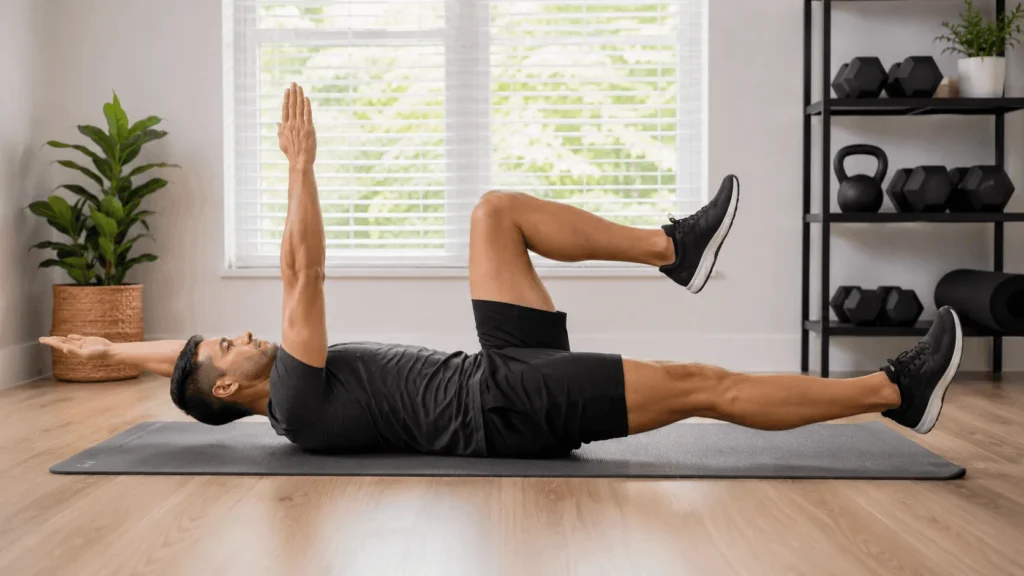

The dead bug exercise trains your core to hold still while your arms and legs move. Most crunches and sit-ups never teach that skill. The move is named for the position it puts you in. You look like an insect that has flipped onto its back, knees and arms lifted. It builds the stabilizing strength that protects your lower back during everyday tasks, like lifting groceries or picking up a child. It needs no equipment. Yet it ranks among the most useful core exercises for beginners, older adults, and lifters recovering from back pain. This guide covers exactly how to perform the dead bug, the muscles it targets, and the mistakes that cancel out its benefits. It also shows how to progress it once the basic version feels easy.
What Is the Dead Bug Exercise
The dead bug exercise is a floor-based core stability drill. You lie on your back with hips and knees bent to 90 degrees and arms reaching toward the ceiling. From there, you lower one arm and the opposite leg toward the floor. Your lower back stays flat against the mat the whole time. Then you return and switch sides. A crunch or sit-up asks you to move your spine. The dead bug asks the opposite. You keep your spine still while your limbs create instability around it. That anti-extension pattern is what makes the dead bug so effective for building a core that protects itself under load.
Muscles Worked by the Dead Bug Exercise
The dead bug recruits nearly every major muscle in the abdominal wall. That is unusual for a single exercise. The transverse abdominis is the deep, corset-like muscle that wraps your midsection. It does most of the work of keeping your spine stable and your lower back flat. The rectus abdominis, the muscle behind the visible “six-pack,” controls the position of your ribcage relative to your pelvis. Your internal and external obliques resist the rotational pull created by moving opposite limbs. Your hip flexors and shoulder stabilizers get involved too, since they control the limbs creating that instability. The exercise trains these muscles to work together rather than in isolation. That is why it carries over into real lifting and daily movement better than isolated ab exercises like crunches.
Benefits of the Dead Bug Exercise
The biggest benefit of the dead bug is what it teaches your body to avoid. It trains you not to let your lower back arch when your limbs move away from your torso. That skill transfers directly to squats, deadlifts, overhead presses, and carrying a heavy bag. All of those ask your core to resist extension under load. The exercise is performed lying down with your spine supported. That makes it a gentle way to strengthen the core. It works well if you have lower back pain, are returning from injury, or are new to structured exercise. There is little compressive load on the discs, unlike sit-ups or heavy loaded crunches. The dead bug also builds coordination. Moving opposite arm and leg pairs while keeping the trunk still takes more focus than it looks like it should.
How to Do the Dead Bug Exercise
Starting Position
Lie on your back on a mat with your lower back naturally touching the floor. Bend your knees to 90 degrees and lift your feet. Your shins should sit roughly parallel to the ground. Extend your arms straight up over your shoulders. Gently draw your belly button toward your spine to engage your core. If your lower back is already arching, flatten it against the mat first by tilting your pelvis slightly.
The Movement
Slowly lower your right arm behind your head and your left leg toward the floor at the same time. Keep both a few inches off the ground at the bottom. Your lower back should stay flat the entire time. Pause briefly, then return both limbs with the same control. Switch sides, lowering your left arm and right leg. That full sequence, both sides, counts as one repetition.
Breathing and Tempo
Exhale as you extend your arm and leg away from your body, and inhale as you return to the start. Move slowly on every repetition. Speed is one of the fastest ways to lose core tension and let your lower back do the compensating. A controlled three-second lowering phase teaches your core far more than a fast, sloppy one.
Most people do well starting with 2 to 3 sets of 6 to 10 repetitions per side, resting briefly between sets. Increase reps or slow the tempo before adding load or complexity.
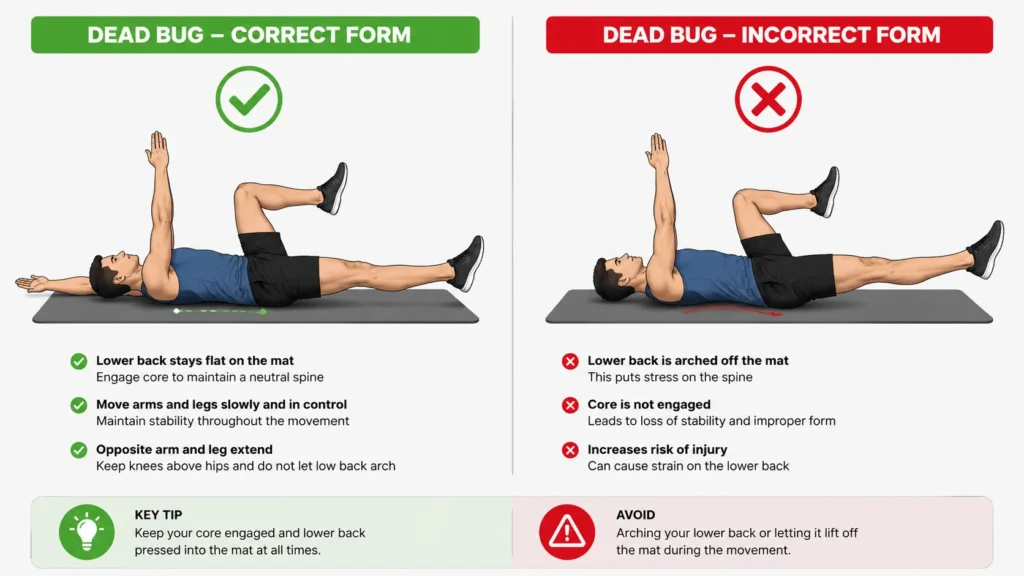
Common Dead Bug Exercise Mistakes
The most frequent mistake is letting the lower back lift off the floor as the arm and leg extend. If you can slide a hand under your lower back at any point, you have lost the position. The exercise stops training your core properly. Fix this by shortening your range of motion. Lower the limbs only as far as you can while keeping full contact with the mat.
Another common error is moving too fast. Momentum lets you fake the range of motion without your core actually controlling it. Slow the tempo down, especially on the way back to the start.
Some people let their ribs flare upward as they reach overhead. That arches the mid back even if the lower back stays down. Keep your ribcage drawn toward your hips throughout the set. Holding the breath and gripping the neck or jaw are also signs of unnecessary tension. Let your exhale do the bracing work instead of your grip.
Dead Bug Variations From Beginner to Advanced
Beginner Modification
If the standard version feels too demanding, keep both feet on the floor with your knees bent. Move only one arm at a time. This removes the leg’s added load. It lets you focus on keeping your lower back flat. Another option is to shorten the range of motion, lowering the limbs only a few inches instead of all the way down. Both options still train the same anti-extension pattern with less demand.
Advanced Progressions
Once the standard dead bug feels controlled for two to three sets of ten to twelve reps per side, raise the challenge. Add a light resistance band around your feet and hands without changing the pattern. Holding a light dumbbell in the extended hand also raises the difficulty, as does a soft ball between your knees. For more demand, try the dead bug reach. Tap the extended hand and heel to the floor and hold briefly before returning. Slowing the tempo to a three or four second count is often more effective than adding weight. It keeps the load on the core instead of the limbs.How Often Should You Do the Dead Bug Exercise?
The dead bug responds well to frequent, low-fatigue practice. Aim for two to four sessions a week, with two to three sets of eight to twelve reps per side. That is enough to build noticeable core control within a few weeks. The exercise causes little muscle soreness, so you can do it on consecutive days. You can also use it as a warm-up before heavier lifting. It primes the core to stabilize the spine before a squat or deadlift session. Quality matters more than volume here. A slow, controlled set of eight reps with a flat lower back builds more real strength. Twenty rushed reps with an arching back will not.
Who Should Check With a Doctor First
The dead bug is generally considered one of the safer core exercises. It is not automatically right for everyone, though. Talk with a doctor or physical therapist first if you are pregnant or have had recent abdominal or back surgery. The same goes if you have a diagnosed hernia or acute lower back pain that has not been evaluated. If you feel sharp pain, numbness, or tingling at any point, stop immediately. Mild muscle fatigue in the abdominals is expected. Pain in the joints or spine is not, and it is a sign to reassess your form.

Dead Bug vs Bird Dog vs Plank
These three exercises are often grouped together, but they train slightly different things. The plank challenges your core to resist sagging under a static load. That is an anti-extension pattern held in one position. The bird dog, done on hands and knees, challenges your core to resist rotation as you extend opposite limbs. That makes it more of an anti-rotation exercise. The dead bug resists rotation and extension too, but it does so lying down with your spine fully supported. That makes it the most back-friendly of the three for beginners. A well-rounded routine benefits from including all three.