

The inverted row is one of the most underrated back exercises you can do. It trains the same pulling muscles as a pull-up, but it lets you control the difficulty by changing your body angle instead of fighting your full bodyweight from a dead hang. That makes it a smart entry point for beginners and a useful accessory move for lifters who already train hard.
Most people know this move by more than one name. You will see it called a bodyweight row, an inverted barbell row, or simply a body weight row. They all describe the same basic pattern: lying under a fixed bar with your feet on the ground, then pulling your chest up to it while your body stays rigid.
What Is an Inverted Row?
An inverted row is a horizontal pulling exercise performed by hanging your body underneath a bar, a set of straps, or a sturdy edge, then pulling your torso up while keeping your body in a straight line from ankles to shoulders. Your feet stay on the floor the entire time, which means you are moving a percentage of your bodyweight rather than all of it.
This is what separates it from a pull-up. A pull-up moves your full bodyweight vertically. An inverted row moves a portion of it horizontally, and you can adjust that portion just by changing the angle of your body relative to the ground. The steeper your body angle, the harder the row becomes.
Muscles Worked by the Inverted Row
The inverted row is primarily a back builder, but it recruits several muscle groups at once.
The latissimus dorsi and the rhomboids do most of the pulling work, drawing your shoulder blades together as your chest rises toward the bar. Your rear deltoids assist with that same shoulder blade movement and help stabilize the shoulder joint throughout the range of motion. Your biceps and forearms handle the elbow flexion needed to bring your body upward.
Your core and glutes are working too, even though this is technically a pulling exercise. Keeping your hips from sagging requires constant tension through your abs, obliques, and glutes, which is why a strict inverted row often leaves your midsection feeling worked the next day.
Inverted Row vs Bodyweight Row vs Barbell Row
These terms cause more confusion than they should, so it is worth clearing them up before you start programming this movement.
An inverted row and a bodyweight row are the same exercise. The word “inverted” refers to your body position: you are essentially doing a horizontal pull-up with your body flipped upside down relative to a normal row. “Bodyweight row” simply emphasizes that you are lifting your own weight rather than external load, but it describes the identical movement.
An inverted barbell row usually refers to setting a barbell across a squat rack and rowing underneath it, as opposed to using a suspension trainer, gymnastics rings, or a fixed bar. It is still an inverted row, just with a specific equipment setup.
A barbell row, without “inverted” in front of it, is a completely different exercise. That version has you bent over at the hips with a loaded barbell in your hands, pulling the bar to your torso. It loads your lower back and hamstrings far more than an inverted row does, and it requires much more technical control to perform safely with heavy weight.
How to Do an Inverted Row
1. Setup
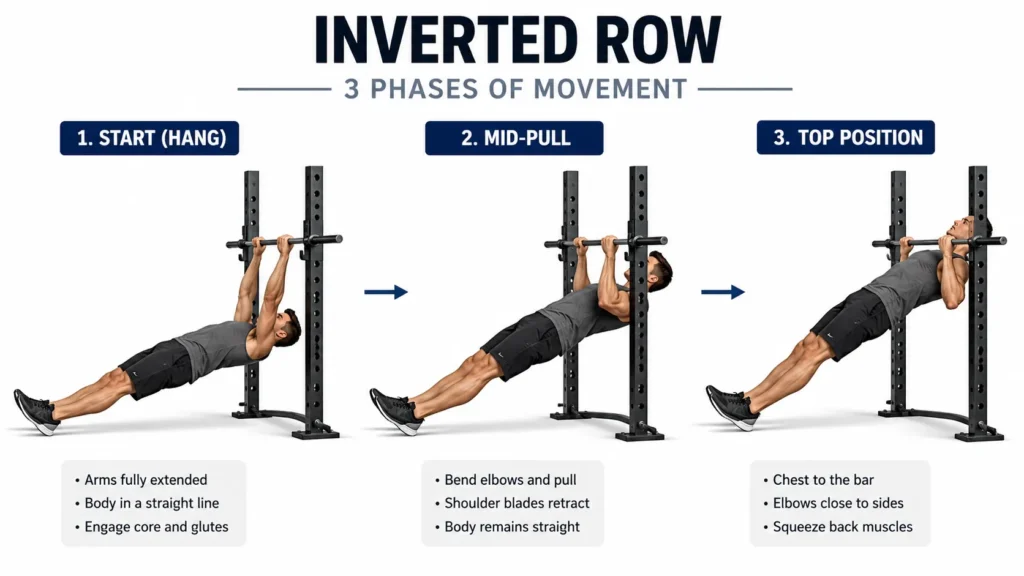
Set a barbell in a squat rack at roughly hip height, or use gymnastics rings, suspension straps, or a sturdy table edge. Lie underneath it and grab the bar with an overhand grip, hands just outside shoulder width. Extend your legs out in front of you with your heels on the floor and your body forming a straight diagonal line.
2. Execution
Brace your core and squeeze your glutes before you move. Pull your chest up toward the bar by driving your elbows back and down, keeping them close to your body rather than flaring out to the sides. Pause when your chest nearly touches the bar, then lower yourself back down under control until your arms are fully extended.
3. Common Form Mistakes
Sagging hips is the most frequent error, and it happens when the core disengages partway through a set. Keep your glutes and abs tight for the entire rep, not just the pull. Craning the neck forward to reach the bar is another common issue; keep your chin tucked and let your chest do the work instead. Finally, avoid partial range of motion. If you cannot pull your chest all the way to the bar with good form, raise your body angle to make the row easier rather than cutting the movement short.
How to Do Inverted Rows at Home
You do not need a gym to train this movement. An inverted row at home is very achievable with basic household items or inexpensive equipment, which is part of why this exercise has become a staple of home workout routines across the US.
1. Using a Sturdy Table
A solid, heavy table that will not tip or slide can work as an anchor for inverted rows at home. Lie underneath it, grip the edge firmly with both hands, and row your chest up toward the tabletop. Test the table’s stability with light bodyweight pressure before committing to a full set, and avoid glass or wobbly furniture entirely.
2. Using a Doorway Row Bar
Doorway pull-up bars that mount with tension or brackets can double as row anchors when set low. Lower the bar toward the floor, lie underneath it, and row as you would with a barbell. Check the manufacturer’s weight rating and mounting instructions first, since not every doorway bar is rated for a horizontal pulling load.
3. Using Suspension Straps
Suspension trainers like TRX bands are one of the most versatile tools for inverted rows at home because they let you adjust difficulty just by shifting your foot position or the angle of your body. Anchor the straps to a secure door frame, a sturdy beam, or a rated wall mount, then walk your feet forward to increase the challenge or backward to reduce it.
Inverted Row Progressions and Regressions
One of the biggest advantages of this exercise is how easily you can scale it to your current strength level.
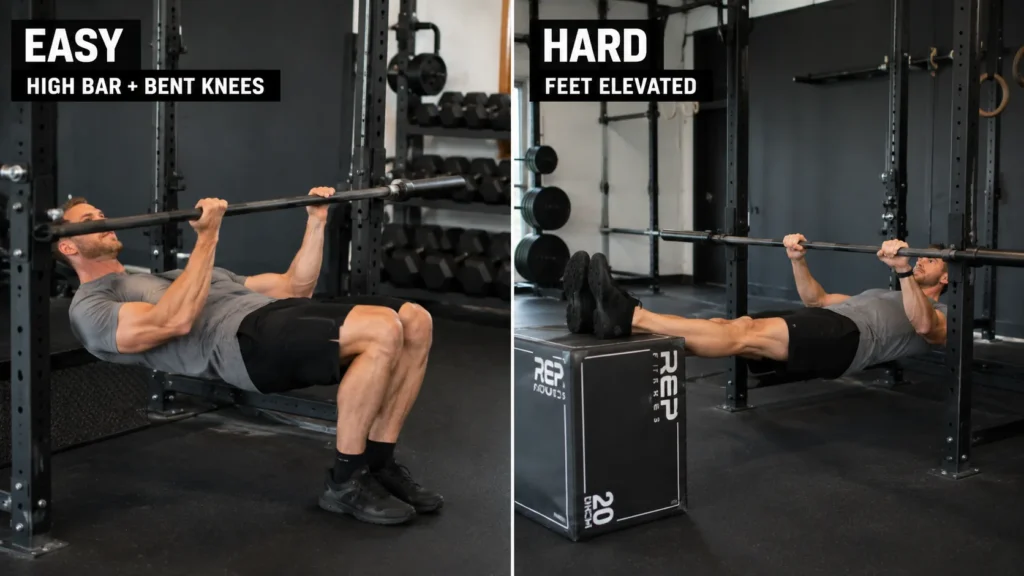
If a strict inverted row feels too difficult, raise the bar higher or bend your knees so your body forms a shallower angle. This reduces the percentage of bodyweight you are pulling. As you get stronger, lower the bar or straighten your legs to increase the angle and the resistance.
Once bodyweight rows with feet on the floor feel too easy, elevate your feet on a bench or box. This shifts more of your weight into the pull and makes the exercise noticeably harder without adding any external load. From there, a natural next step is adding a weighted vest or a plate resting on your chest for extra resistance.
How to Program Inverted Rows Into Your Workout
For general strength and muscle building, three to four sets of eight to twelve reps works well, performed once or twice per week as part of a pulling or upper body session. If you are using the inverted row as a stepping stone toward your first pull-up, lower reps with a harder angle, such as three sets of five to eight reps at a steep body position, will build the strength transfer you need more effectively.
Pair the inverted row with a pushing exercise like push-ups or a bench press variation to keep your upper body balanced. Many home workout programs structure this as a simple push-pull superset, alternating between the two movements with minimal rest.
Benefits of the Inverted Row
The inverted row builds real pulling strength without requiring any weight plates, a barbell, or a gym membership, which makes it one of the most accessible back exercises available. It is also easier on the shoulders and elbows than many other pulling movements, since the horizontal pulling angle places less strain on the joints than a vertical pull like a pull-up.
Because you can adjust the difficulty in small increments, the inverted row also works for a wide range of fitness levels within the same household or training group. A beginner and an advanced lifter can both do inverted rows in the same session, just at different angles.
Inverted Row vs Pull-Ups
Pull-ups demand more raw pulling strength because you are lifting your entire bodyweight against gravity in a vertical line. The inverted row is more approachable for beginners, and it also allows for higher training volume without the same level of fatigue, since you can dial in an easier angle on high-rep days.
Many coaches use the inverted row specifically to build the strength base needed for a first pull-up. Training rows at a difficult angle for several weeks tends to carry over well to vertical pulling strength, since the muscles involved overlap significantly.
Safety and Who Should Avoid This Exercise
The inverted row is generally low risk when performed with good form, but a few precautions matter. Always test the stability of your anchor point, whether that is a rack, a table, or a doorway bar, before loading it with your full bodyweight. Anyone recovering from a recent shoulder, elbow, or wrist injury should get clearance from a physical therapist or doctor before adding this movement back into a routine.
If you feel sharp pain in the shoulder joint during the pull, stop the set and reassess your grip width or hand position. A grip that is too narrow or too wide can place uneven stress on the shoulder, so experiment within a shoulder-width to slightly-wider range to find what feels stable for your own body.
People with significant wrist pain may want to switch to a neutral grip using gymnastics rings or straps instead of a fixed barbell, since a rotating handle removes some of the twisting stress on the wrist joint. Pregnant individuals in later stages should also modify the angle to something closer to upright, since lying flat under a bar becomes uncomfortable as the pregnancy progresses, and any exercise program during pregnancy should first be cleared by a doctor.
How Often Should You Train Inverted Rows
Twice a week is enough for most people to see steady strength gains, as long as at least 48 hours separate sessions to allow the back and biceps to recover. Lifters chasing a specific goal, such as their first strict pull-up, sometimes train the movement three times a week using a lighter angle on the extra day so fatigue does not interfere with the harder sessions.
Track progress by writing down the bar height, foot position, and rep count each session. Because the inverted row scales through so many small adjustments, a simple log is the easiest way to confirm you are actually getting stronger over time rather than guessing from memory.